Save Time and Money: Prepare Your Manuscript the Right Way
How to Prepare Your Manuscript
Writers can avoid a lot of production headaches (and expense) by setting up manuscripts correctly before they begin writing.
If you’re already halfway through your manuscript, don’t panic. Just take a few minutes to back up and apply these tips. They apply equally to manuscript for print books or ebooks.
Preparing your manuscript properly is a huge timesaver. Not only will your manuscript will be much easier to work with as you go, but you won’t need to spend hours cleaning it up afterward. Then when you’re done writing, your book will be ready to send to your editor, who will appreciate receiving a clean and organized file.
Good manuscript prep has even bigger benefits during the production phase. Giving your book designer a clean, well-prepared file will help them finish your book faster, keep your costs down, and greatly reduce the chance of errors making it into your final print or ebook file.
1. Use document styles and use them consistently.
Styles are pre-defined formatting instructions used repeatedly throughout a document. All word-processing programs including MS Word and Pages for Mac have them. If you’ve never worked with styles before, you’ll soon be wondering how you got by without them for so long. They’re a fabulous tool that will simplify your writing life and contribute to a clean, professional manuscript.
Here’s how styles work. Each element in your manuscript (chapter titles, headings, body copy, quotations, etc) gets its own style tag, which stores whatever formatting commands you assign. Then when you want to format something—let’s say chapter titles—you just apply your “chapter title” style, and bingo, your chapter title formats itself like all the rest. If you want to change the formatting later, you just update the style once, and all your chapter titles will update simultaneously.
Using Styles helps during both writing and production. Writing is easier if your manuscript is clean and organized. And design (print or ebook) is more efficient if style tags are already in place.
When your book designer imports your Word doc (most manuscripts are submitted in Word) into InDesign, all those style tags will import too, which is a huge help. The designer will create a new design and change the formatting, so it doesn’t matter what styles you use. Don’t spend to much time messing with how everything looks. It’s the tagging that’s important.
What if I don’t use styles?
We all know it’s pretty easy to forget exactly how we formatted something three chapters ago and accidentally switch to a new formatting style. After a while it’s difficult to tell what’s what in the manuscript because the formatting is inconsistent. Complex manuscripts, especially non-fiction, can become really messy really fast.
Manuscripts prepared without document styles—by formatting each word or section locally—are often a Frankenstein’s monster of inconsistent formats including:
- Mismatched chapters titles, headings and subheadings. This can make it difficult for your designer to distinguish the information hierarchy. (“Is that a sub-heading or a sub-sub-heading?”)
- Inconsistently formatted body copy, often pasted together from different sources. (Such as Word, Scrivener, text notes, Google Docs, etc.)
- Quotations pulled from books or articles along with their original formatting.
- Paragraphs indented with the tab key or space bar (PLEASE don’t do this).
- Soft returns alternating with hard returns, double paragraph returns, etc.
If you’ve got a complicated, format-heavy manuscript (cookbooks, textbooks, travel guides, memoirs with lots of perspectives, etc), having your designer do all that manuscript tagging for you will take them hours and add to your project cost. Also the designer won’t be as familiar with your content as you are, so no matter how careful they’re being, something could be mistagged.
**Be sure to let your designer know ahead of time if your manuscript contains any unusual characters…foreign letters/words, mathematical or scientific symbols, or diacritical symbols.**
How to Use Styles in Microsoft Word
If you’re working in Word (most writers are), just go to the home screen and you’ll see the Styles Pane on your far right. You can use Word’s preset styles or make your own. It makes no difference what the formatting looks like in the manuscript…it’s the tagging that’s important.
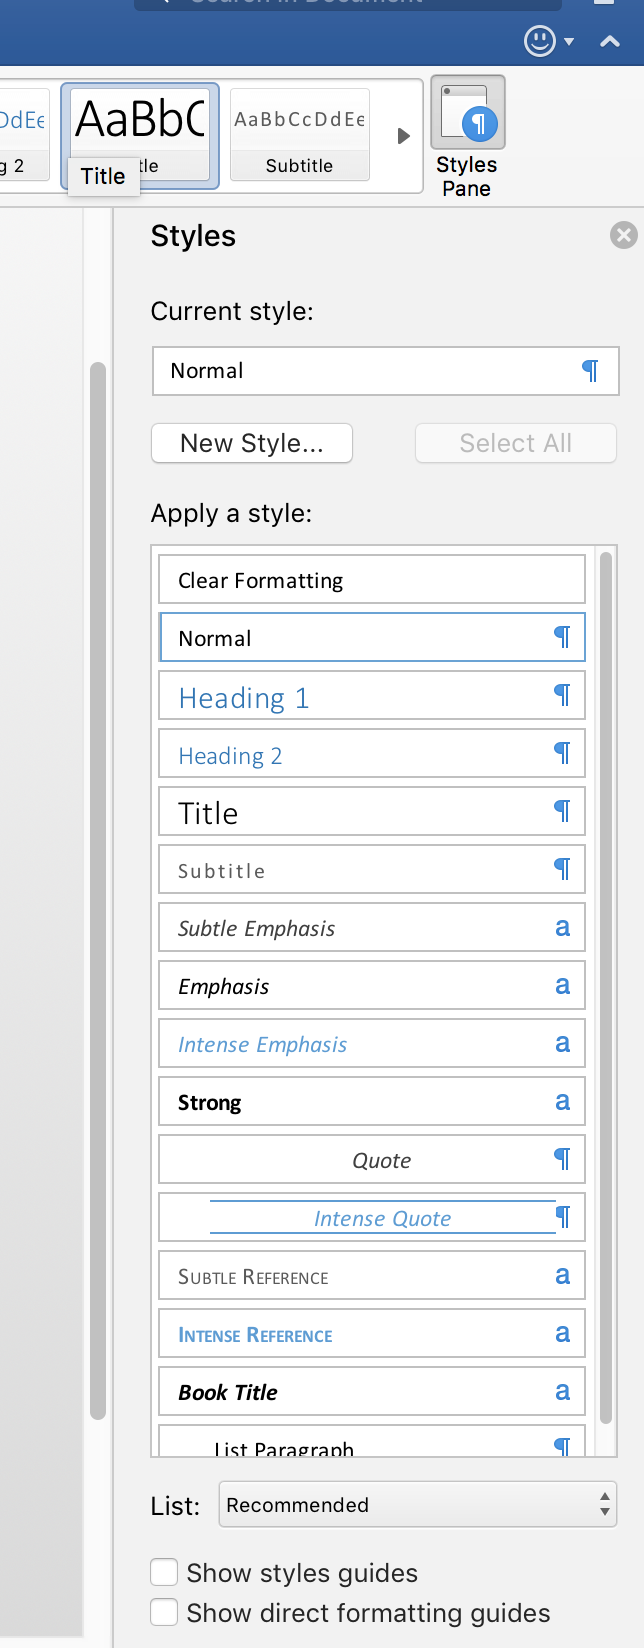
Common elements that need their own style tags include:
Paragraph styles
- Main body copy
- Chapter titles
- Headings
- Subheadings (different tag for each level)
- Quotations
- Line spacing
- Picture captions
Character styles (for small amounts of text within the paragraph)
- Book titles
- Words as words (“My daughter’s favorite word is persnickety.”)
- Foreign words
- Mathematical or scientific characters
- Bulleted lists
Table styles and list styles
- Bulleted lists
- Numbered lists
- Tables
2. Resist the urge to pre-design your manuscript
It’s best not to “design” your manuscript as you go. (By that I mean adding graphics, doing pre-formatting, or creating mock layouts.)
You may think pre-designing in Word will save time or money later, but it won’t. In fact just the opposite. The professional book design process starts with a clean manuscript, and all that pre-formatting will have to be stripped out, either by you or by your designer at your expense. Simple and clean, that’s what book designers need. You’ll have plenty of input on the design later, I promise.
Pro Tip: You’re presumably hiring a book designer for their professional experience and design skill. You’ll get much better results by communicating your goals for the book and then giving your designer space to do what what he/she does best. When authors micromanage the book design process, quality often suffers.
When you work with us, we’ll talk with you beforehand about your project, your goals, and design approaches. Then we’ll make you design samples, which you are welcome to have us tweak. Again, you will have lots of opportunity for design input and nothing’s final until you say it is.
3. Submit your manuscript as a single file
If you are writing your chapters in separate files, be sure to assemble them into a single manuscript for your designer. Your manuscript file should include all front matter, the main text, and all back matter.
Don’t send piecemeal files. If you do, you’ll be inviting errors in your final book. Thats because there’s no way the design team may not know it something’s missing or if sections are out of order (and it’s not their responsibility). Besides, why pay a designer to sort through all your files? Make sure your manuscript is final and complete before you send it out into the world.
Pro Tip: If you aren’t sure what front or back matter to include, ask your ebook designer. He or she should be able to give you genre-specific suggestions or even provide helpful boilerplate text. This is one of many reasons to hire a good book designer (like us!) and do it early in the writing process.
4. Use callouts to indicate photo placement
Don’t put your photos, graphics, or illustrations directly into the manuscript. Instead, use callouts, which look like this: <insert [photo name] here>.
If your images aren’t location-specific, indicate what chapter they belong with or whether they can go anywhere. Being flexible allows designers to create the most artful, reader-friendly layout possible.
Then bundle all your artwork together and zip it into a single file.
Pro Tip: Be sure to talk to your designer beforehand about image sizing, especially if you’re planning to print. Too small, and everything will be fuzzy. Too large, and your ebook file will cost a fortune to download. We give clients clear instructions on image sizing (or re-size your images ourselves) so that all images look great after publication and the book looks professional.
5. Don’t grab images from the internet
It’s a million times easier to source your photos correctly from the start than to replace them later because of permission issues. Trust me.
If you just grab photos from a Google search and publish them in your book, you could be sued. (It happens regularly.) And it’s not your book designer’s responsibility to get permissions for you after the fact. (Besides, that would cost you a fortune in extra hours.) As a self-publisher, you are responsible for making sure your images are legal.
The best workflow is to get photos from a reputable stock photo site (We like 123RF) or, if you’re doing a cookbook or other personal project, hire a good photographer to have your own high-quality photos taken.
Pro Tip: Stock photos are available in free, watermarked, low-res sample versions. Just download those. Don’t buy anything until you’re sure the photo is going to end up in the book and your designer has confirmed what size to get. (For print it should be 300 dpi at reproduction size, but you won’t know what the reproduction size is until the layout is finished.)
6. Review your “final” manuscript before sending it out for design
I don’t mean edit and proof it. That should already be done.
But once the editing and proofing are done and you think your manuscript is final, print it out and give it one last read-through. A careful read-through. Ideally after letting it sit in a drawer for a week or two.
Is everything there…all front matter, all chapters, and all back matter? Does everything read smoothly? Reading through a print copy of your manuscript should bring to light any previously overlooked errors or omissions.
Another reason to print and read the final manuscript has to do with editorial tracking. Your copyeditor probably made a lot of suggestions, and if you accepted some but not others, you may have inadvertently introduced inconsistencies in the manuscript. When you re-read the final manuscript, keep an eye open for that.
Pro Tip: Don’t forget to share the final manuscript with any other stakeholders—co-writers, managers, clients…anyone that has input on the content. Now is the time to incorporate their requests. If you wait until the proof state (post-layout) you’ll have to pay for those changes and your project will take longer.
Wrapping it Up
By taking the time to prepare your manuscript professionally you’ll minimize publishing mistakes, get your completed print and ebook files faster, and avoid extra project charges. You’ll enjoy the writing and production process more because you’ll have less friction and more fun. And your book designer will love you!
About the Author
Renee D'Antoni: Renee is an editor, photographer, and owner of eBook DesignWorks.